
FMS Getting Started
In this guide you'll learn how to use Face Machine for face recognition. You will also find essential information and some useful tips on your Face Machine personal account.
Before you begin, make sure that you've done a couple of things:
- created your personal account at https://cognitive.3divi.com;
- purchased the Face Machine license or got the trial. Please contact sales at face@3divi.com to purchase Face Machine License
After that, you're ready to get started with Face Machine!
First Steps
Log in to your personal Face Machine account.
You can see the following sections on your dashboard (see Fig. 1):
- Persons
The number of persons successfully added to the database. In this section, you can add a new person to the database by clicking “+” in the top-right corner. - Edge devices
The number of created edge devices. In this section, you can create a new device by clicking “+” in the top-right corner. - Lists
The list of created Lists with persons and devices. You can create a new List by clicking “+” in the top-right corner. - Recent actions
The short log of changes (for example, creation or deletion of a List/Device/Person, etc.). To view the full log, click View all. - COMPARISON
If you want to compare faces, select or drag images to this field and click Compare. The comparison result will open in a new window. - SEARCH
If you want to search a face in the database, select or drag an image to this field and click Search by Persons. The result will open in a new window. - API
The token that you can use to access API or test it using GraphiQL (see Testing 3DiVi FMS API).
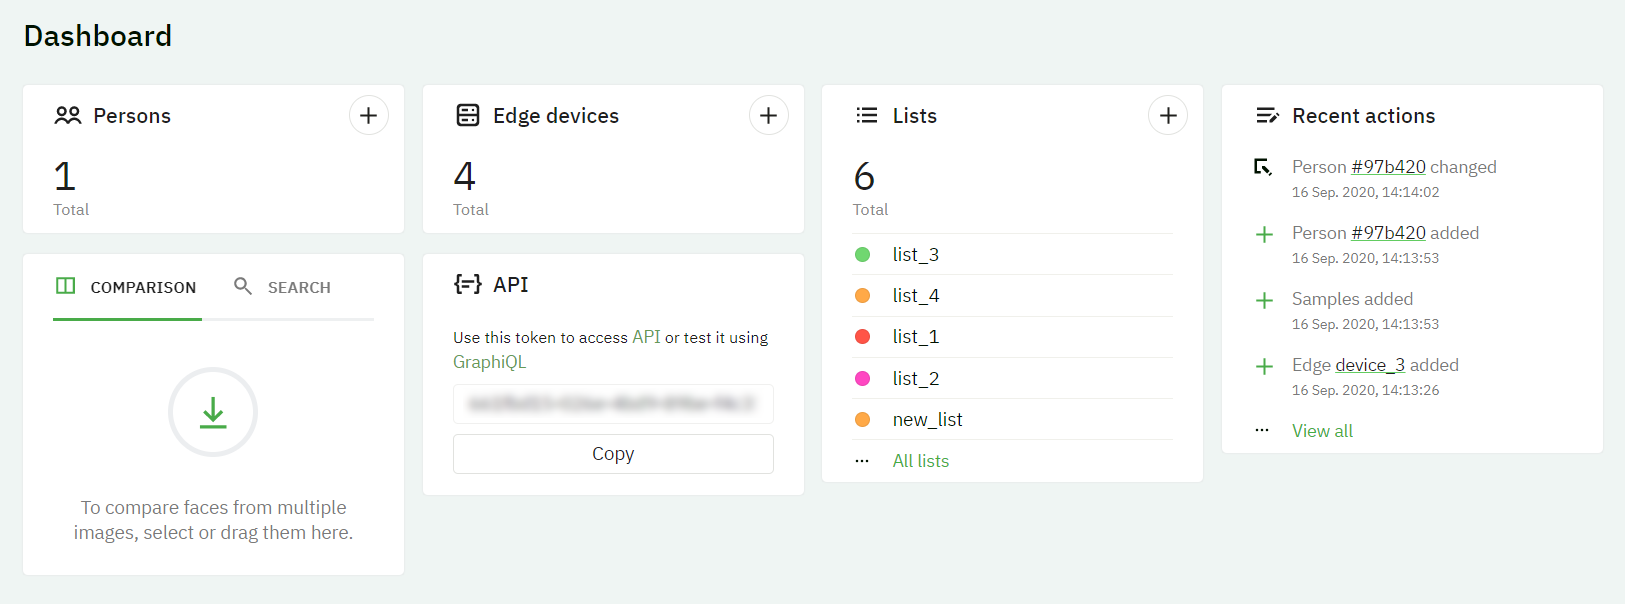 Figure 1. Face Machine personal account. Dashboard
Creating Edge Devices
To create a new edge device, go to the Edge devices tab and click “+” in the top-right corner. Specify the device name and click Create (see Fig. 2).
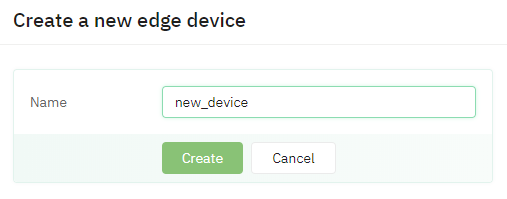 Figure 2. Creating an edge device in the Face Machine Server
_Note: See how to create and manage Edge Devices using Face Machine API in the Face Machine API Documentation.
Creating Person Profiles and Lists
Creating Person Profiles
- To recognize faces, you have to add persons to the database. To do this, go to the tab Persons and click "+ Create" in the top-right corner. In a new window, select or drag-and-drop an image and click Select Image. As an option, you can create an anonymous person, if you don't want your images to be stored on the server. To do this, click Make anonymous. Before uploading the picture, please read our Recommendations for Uploaded Images to make sure that the picture is valid and can be used for recognition.
- After the picture is added, you can also add some information about the person, for example, his/her name, gender, date of birth. However, this is optional: the only thing that you need for recognition is a person’s face. Gender is estimated automatically, click Yes or No to set the gender. Click Save to save the changes (see Fig. 3).
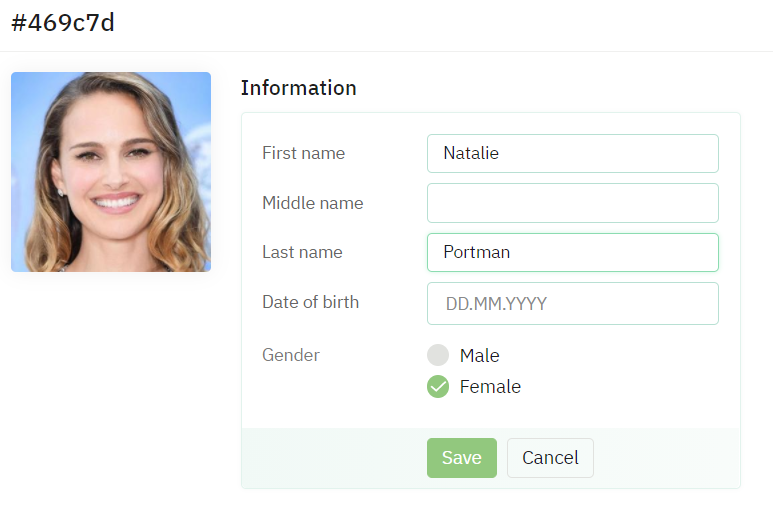 Figure 3. Created person profile
_Note: See how to create and manage Person Profiles using Face Machine API in the Face Machine API Documentation.
Recommendations for Uploaded Images
- The image should be converted into a base64 string for further processing.
- Import a clear image of a person’s face. Make sure that the image is not blurry.
- The person’s face on the image should be placed upright.
- It’s recommended to import the pictures of a person looking directly into the camera.
- Try to avoid great face angles.
- Avoid bright backlighting and glare in your pictures.
- Person’s facial expression should be neutral.
- The eyes of a person in the picture should be opened.
Sample image (Fig. 4) of a face to be added to the database:
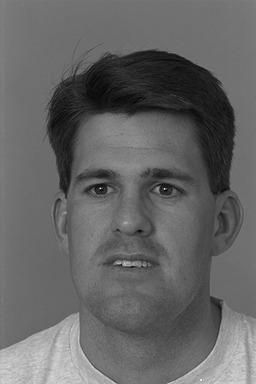 Figure 4. Sample image
Creating Lists
To create a new List, go to the Lists tab and click “+” in the top-right corner. Specify the List name, select its color (optional), and click Create (see Fig. 5).
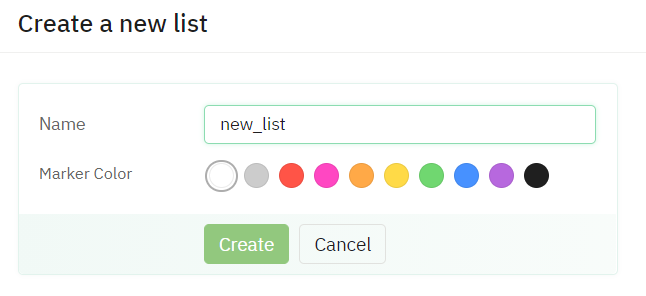 Figure 5. Creating a list in the Face Machine Server
_Note: See how to create and manage Lists using Face Machine API in the Face Machine API Documentation.
Adding Person Profiles to Lists
- Open a profile and click “+“ in the Lists section and select the List. As a result, this person will be added to the selected List (see Fig. 6). Please note that all persons that you want to be recognized should be added to the list.
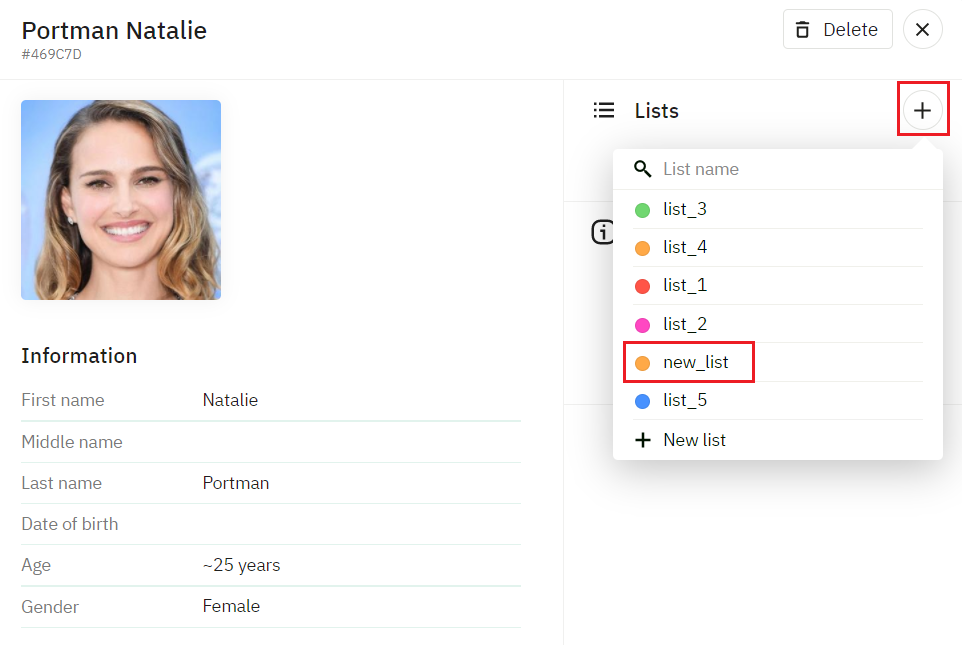 Figure 6. Adding a person profile to the List
_Note: See how to add a Person Profile to the List using Face Machine API in the Face Machine API Documentation.
- When a person is added to the List, you’ll see a small circle in the profile preview. Different Lists are highlighted with different colors, which makes it easier to see what persons are added to the same list. In the example below both persons are added to new_list, which is highlighted with a yellow color (see Fig. 7). You can filter persons by Lists or genders.
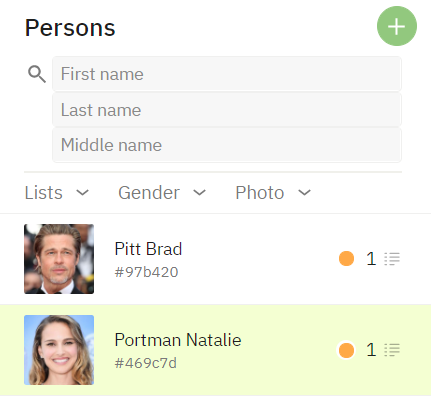 Figure 7. Person profiles added to the same list
Linking Edge Devices to Lists
Go to the Edge devices tab and select an Edge device. Click “+” in the Lists section next to the information about the edge device and select the created Lists with persons for recognition (see Fig. 8). It’s necessary to link this List to the device, otherwise, faces won’t be recognized.
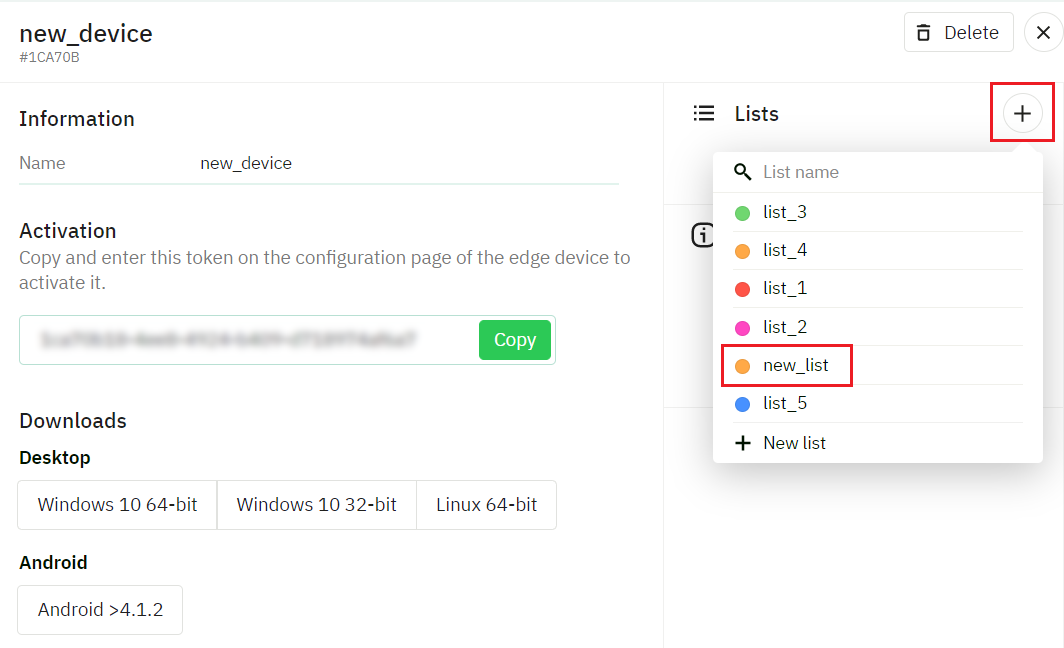 Figure 8. Linking an edge device to the list
_Note: See how to link an Edge Device to the List using Face Machine API in the Face Machine API Documentation.
Viewing the Events
The device automatically generates events, for example, when a face is detected, when a face is identified, etc. You can see the full list of generated events in the Events tab (see Fig. 9). You can filter events by Source and Date.
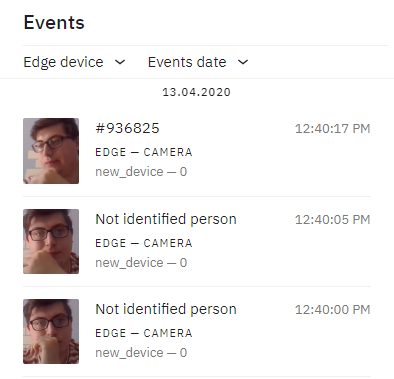 Figure 9. An example of recent events
Viewing the Recent Actions
- In the Recent actions tab, you can view the complete log, where the information about persons, devices and events is stored (see Fig. 10).
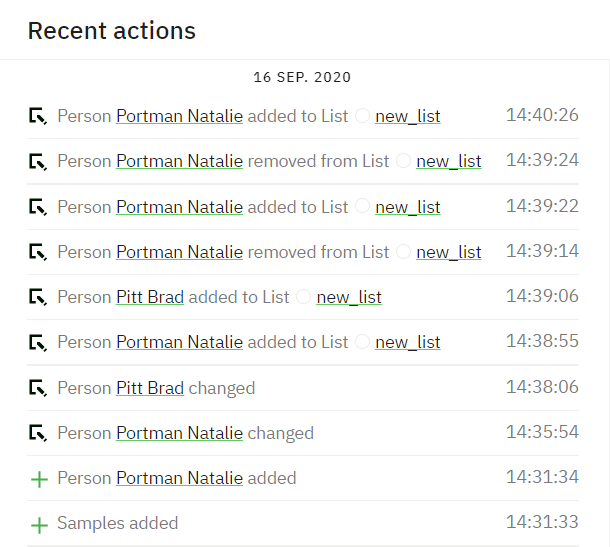 Figure 10. An example of recent actions
- You can also see the logs for profiles and devices. To view them, just open a profile or a device and click Related actions on the right. You can also see Metadata for profiles and devices (see Fig. 11).
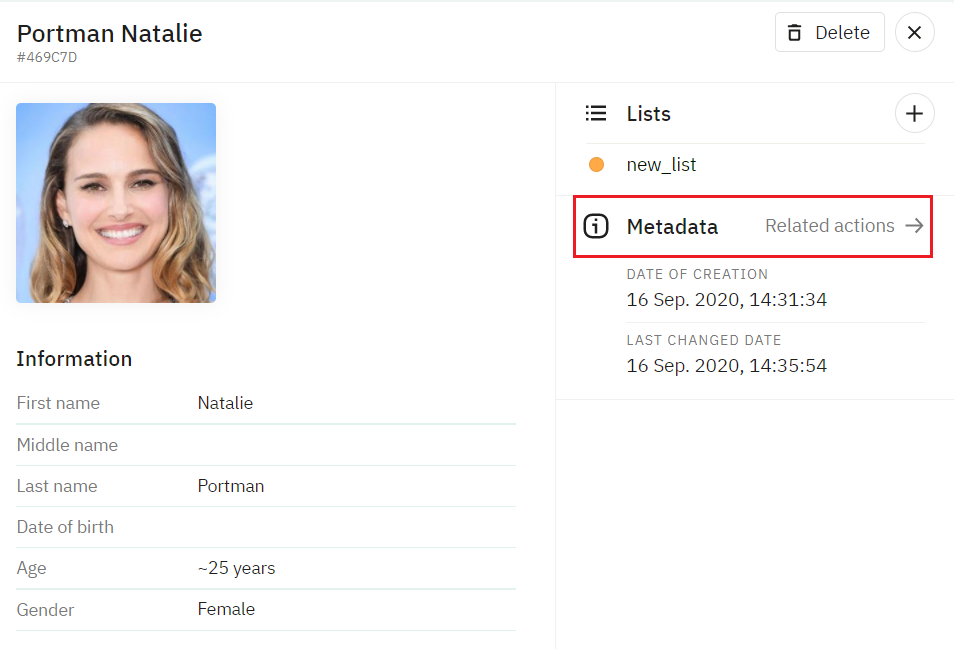 Figure 11. Information about a person profile: metadata and related actions
Settings
If you want all unidentified persons to be automatically added to the database, go to the Settings tab and enable Automatic creation of Person profiles. Unidentified persons will be added in the Autocreated list. Automatic updating of photos means that a person's image will be updated if a sample of better quality is received (see Fig. 12).
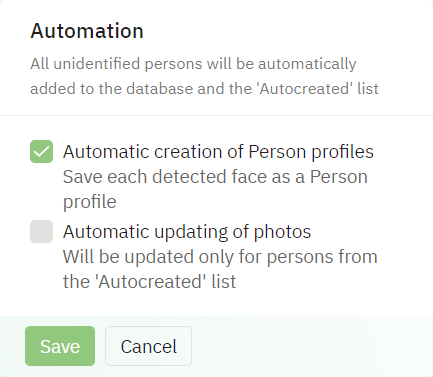 Figure 12. Settings: automatic creation of profiles and updating of photos