
FMC Getting Started
Setting Up the Environment
Camera Positioning and Shooting
- Illuminance level in the recognition area should be at least 200 Lux (only when the camera is located at a distance of no more than 3m from a face), the optimal value is from 300 to 500 Lux.
- Avoid back light whenever possible.
- Light should be diffused. Avoid harsh shadows on a face.
- The camera should observe the face in a horizontal plane at an angle from 0 to 30 degrees, the optimum angle is from 0 to 15 degrees (see Fig. 1).
- The camera should observe the face in a vertical plane at an angle from 0 to 20 degrees, the optimum angle is from 0 to 15 degrees (see Fig. 1).
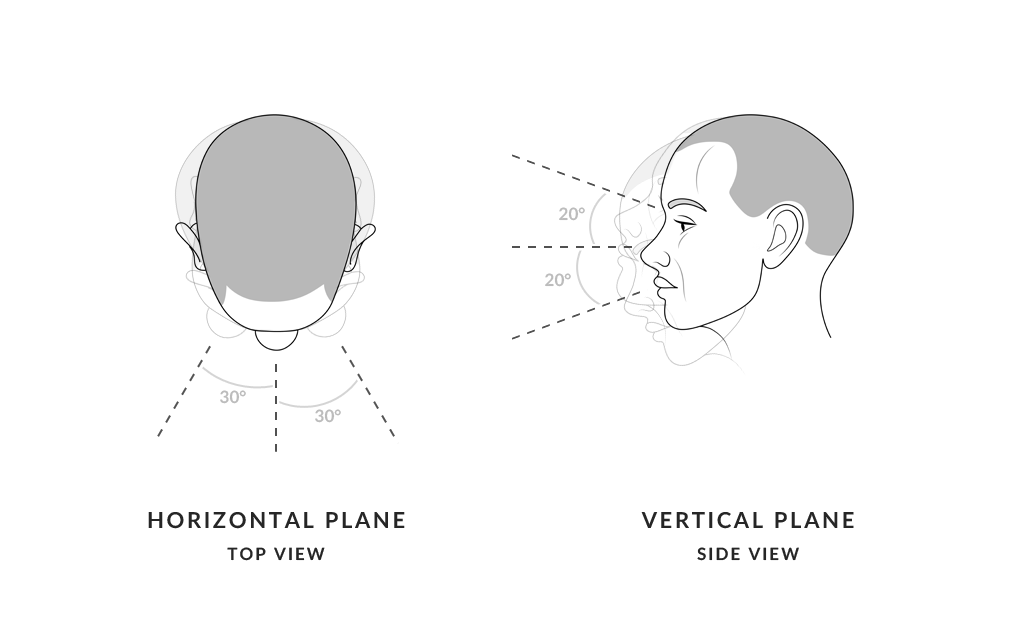 Figure 1. Head rotation angles.
- It is recommended to place the camera at the face level.
Recommended Cameras
We recommend to use Axis P1365MK ii or P1367 (for longer distances).
General recommendations for cameras are:
- 1080p (Full HD) resolution.
- Frame rate of at least 10 FPS.
- Suitable resolution and lens: the distance between the eyes of a face in the frame should be at least 30 pixels in the far field (for example, at the entrance) and at least 50 pixels in the near field (when a person already passes by the camera and leaves the frame).
- Function of adjusting the exposure and shutter speed to prevent blurry frames of people passing by.
- If a camera supports WDR, Backlight compensation, Highlight compensation, it is recommended to turn these functions off, otherwise the image can be blurry.
FMC Desktop
Installation
Note: Microsoft Visual C++ Redistributable for Visual Studio must be installed on your computer. Please follow one of the links below to download this package:
- x86: vc_redist.x86.exe
- x64: vc_redist.x64.exe
Download and install Face Machine Client for your platform:
- Download for Windows 10 and higher (64-bit)
- Download for Windows 10 and higher (32-bit)
- Download for Linux (64-bit)
Activation
- Run Face Machine Client. In the console, you’ll see the link that you need to copy and paste into your browser, for example, http://localhost:8080/configuration. After this, you’ll see the page, where you can configure Face Machine Client.
- Log in to your personal Face Machine account. Make sure that you have at least one Edge device (see Creating Edge Devices). Copy the device token that you can find in the tab Edge devices > (Name of your device) > Activation. Enter this token in the field at the configuration page of Face Machine Client and click Activate (see Fig. 2).
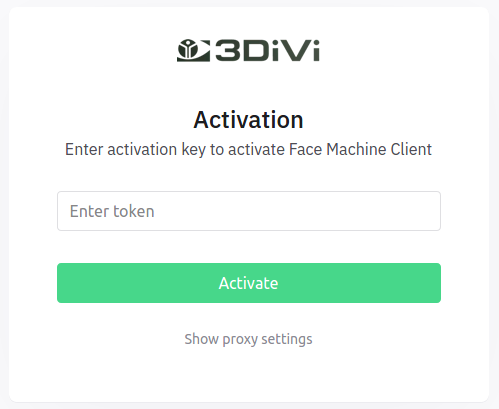 Figure 2. The field for entering the Edge device token and activation button on the authorization page.
- If your device is successfully connected, you will see the status Active at the top of the page (see Fig. 3).
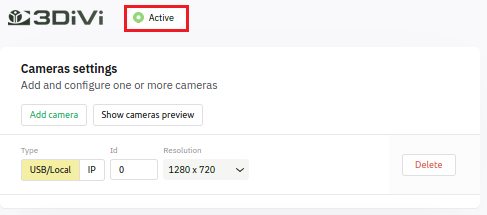 Figure 3. The Active status in the configuration interface.
Adding and Configuring Cameras
- In the section Cameras Settings you can change settings of a webcam, for example, change the resolution or specify the camera (ID) in case there are several cameras connected to your PC. You can set the resolution to 1280x720 or 640x480 (see Fig. 4). Besides, you can set your custom resolution: select Custom and specify width and height.
 Figure 4. Selecting the camera type and resolution in the camera settings menu of 3DiVi Face Machine Client.
- If you want to use an IP camera, you have to select Type > IP and set the stream URL (see Fig. 5).
 Figure 5. Selecting an IP camera in the camera settings menu of 3DiVi Face Machine Client.
- If you want to use several cameras, click Add camera and select camera characteristics (camera type, ID, resolution) (see Fig. 6). You can add as many cameras as you need.
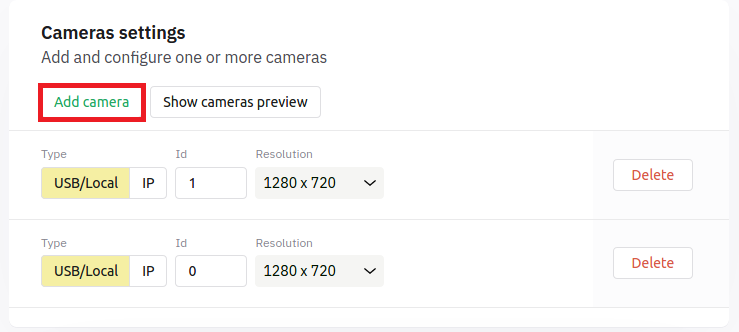 Figure 6. Adding a new camera in the camera settings menu of 3DiVi Face Machine Client.
Click Show cameras preview to view the video from the camera and information about faces:
- red circle: a face is detected but not recognized
- green circle: a face is detected and recognized
- dotted red/green circle: image quality is insufficient, a face is not processed
If a person is recognized, you’ll see the preview of a picture from the database next to his/her face (see Fig. 7).
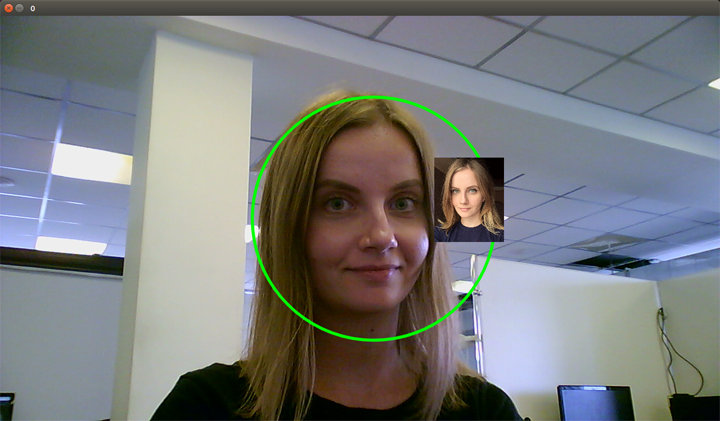 Figure 7. Camera preview: a face is recognized, the picture from the database is displayed next to a face.
- To hide the preview, click the button Hide preview.
Settings
- In the section Additional options (see Fig. 8) you can activate:
- Anonymous mode (images are not saved and not sent to the server)
- Estimation of gender and age
- Estimation of emotions
 Figure 8. Advanced settings menu in the 3DiVi Face Machine Client application.
- If necessary, you can add webhooks to receive events from Face Machine Client in the Webhooks section. To do this, click Add webhook and then specify URL to receive events (see Fig. 9). You can add several webhooks.
 Figure 9. Adding webhooks in the 3DiVi Face Machine Client application.
FMC as a Service
You can run Face Machine Client as a service, which means that the application will run in the OS background. This can be useful, for example, if you don't want to manually restart Face Machine Client after reboot. By default, autostart of the service is disabled. You can find the instructions on how to run/stop FMC as a service and how to enable/disable the autostart of the service in the sections below.
Note: the identification preview is not displayed when Face Machine Client is running as a service.
Running FMC as a Service
Ubuntu 14.04
- To check status/start/stop the FMC service, run the command
sudo initctl [status|start|stop] FaceMachineClient.
Ubuntu 16.04
- To check status/start/stop the FMC service, run the command
sudo systemctl [status|start|stop] FaceMachineClient.
Windows
To start/stop the FMC service:
- Go to Task Manager.
- Click the Services tab.
- Find FaceMachineClient in the list of services, make a right mouse click and select Start/Stop.
Autostart of the FMC Service
Ubuntu 14.04:
- To enable the autostart, run the command
echo manual | sudo tee /etc/init/FaceMachineClient.override. - To disable the autostart, delete the file
/etc/init/FaceMachineClient.override.
Ubuntu 16.04:
- To enable/disable the autostart, run the command
sudo systemctl [enable|disable] FaceMachineClient.
Windows
To enable/disable the autostart:
- Open Task Manager, go to Services and click Open Services.
- Find FaceMachineClient in the list of services, make a right mouse click and select Properties.
- In the General tab, go to the Startup Type field, select Automatic/Manual and click OK.
FMC Android
3DiVi Face Machine Client for Android devices is an application that acts as a background service. It is responsible for local video processing and data exchange with 3DiVi Face Machine Server using http requests or with external systems using webhooks.
Installation
- Turn on the device and connect it to the Internet.
- Download 3DiVi Face Machine Client to any directory on your device.
- Install the application. To install the application, click on the app icon and then click Install. Wait for installation to complete and click Done.
- Run the application to configure the connection to the Face Machine Server. In the quick settings menu, you should see the notification 3DiVi Face Machine and a server port (for example, Server Port: 8080).
- To connect to the server, click Configure (see Fig. 10).
 Figure 10. 3DiVi Face Machine Client settings in the quick settings menu.
Activation
- On the authorization page, enter the Edge device token. To copy the Edge device token:
- Go to the Face Machine Server management interface
- Go to the Edge devices tab > (Edge device name) and find the Activation Info section
- Copy the Edge device token from the Activation Info section
Note: Learn more about configuring Edge devices in Face Machine Server in the Getting Started section.
- Then click the Activate button (see Fig. 11) in the web interface of the application. After successful activation, the application will automatically restart.
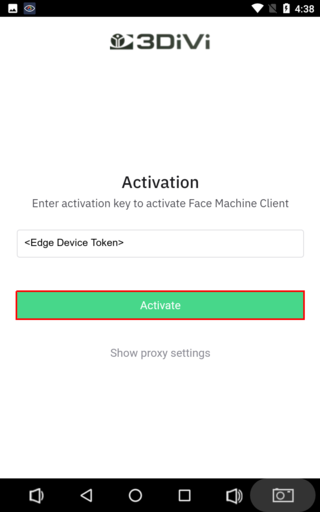 Figure 11. The field for entering the Edge device token and activation button on the authorization page.
Note: If necessary, you can configure a proxy server. To do this, click Show proxy settings on the authorization page and enter the data.
Adding and Configuring Cameras
- To go to the configuration interface of the 3DiVi Face Machine Client application, go to the quick settings menu and click Configure.
- You can add cameras and change their settings in the Cameras Settings section. To use the main camera of the device, select "0" in the Id field. To use the front camera, select "1" (see Fig. 12).
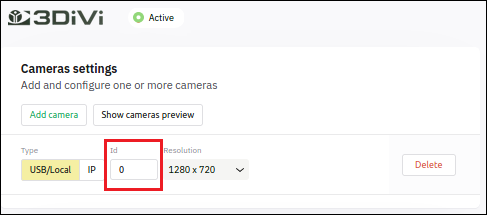 Figure 12. Selecting the camera ID in the camera settings menu of 3DiVi Face Machine Client.
- By default, the device uses a USB/local camera. To use an IP camera, select Type -> IP and specify the stream URL (see Fig. 13).
 Figure 13. Selecting the camera type in the camera settings menu of 3DiVi Face Machine Client.
- You can select the resolution in the Resolution menu (see Fig. 14).
 Figure 14. Selecting the camera resolution in the camera settings menu of 3DiVi Face Machine Client.
- To add a camera, click Add camera and select camera characteristics (camera type, ID, resolution). You can add several cameras (see Fig. 15).
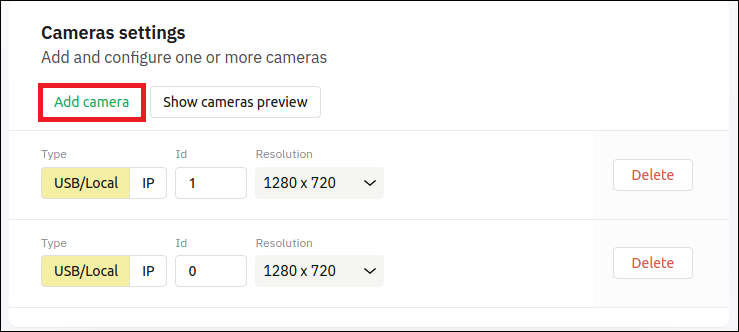 Figure 15. Adding a new camera in the camera settings menu of 3DiVi Face Machine Client.
Settings
- To open the configuration interface of the 3DiVi Face Machine Client application, go to the quick settings menu and click Configure.
- If necessary, you can activate the following options:
- Anonymous face identification mode (images of faces from events are not stored and not sent to the server) – Enable anonymous events mode
- Gender and age recognition
- Emotion recognition
To activate the option, check the box next to it (see Fig. 16).
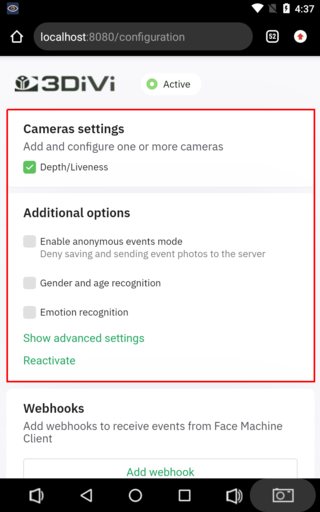 Figure 16. Advanced settings menu in the 3DiVi Face Machine Client application.